OpenMediaVault BeagleBone Black Image

I was looking for an easy way to add some USB storage devices to my home network the other day without buying yet another NAS device. I eventually settled on using one of my spare beaglebones running OpenMediaVault. Once I got the system in a good operational state I dumped an image. I figured I’d share them here. If you try the image and have any problems/questions let me know.

Default console login and password is root/openmediavault
Web admin login and password is admin/openmediavault

Download from here: http://gencarelle.com/public_files/bbb_images/bbb_openmediavault.img

Power button for BeagleBone Black

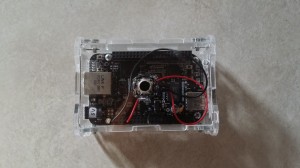
The cheap plastic case I use for the BeagleBone Black in my Mame cabinet hides the power button. Not a big deal because I can safely power on by flipping the power switch on the surge protector it’s plugged in to, and I can power off using the shutdown command in Linux. However, it seemed like the addition of an accessible power button would be nice. So…

20140826_172535

1x  Adafruit Bone Box (http://www.adafruit.com/products/699)
1x Momentary Push Button Switch (https://www.sparkfun.com/products/9190)
2x Jumper Wires M/F (https://www.sparkfun.com/products/9140)

1) Remove the top of the case and drill a 5/16 hole (size according to the actual button you use). Button placement is up to you, mine is almost dead center. If you want to add an additional boot and/or a reset button later make sure to position the first hole to allow this. The plastic is fragile so don’t press very hard when drilling the hole or it will crack. You might not be able to tell from the picture but mine cracked a little on both sides of the hole I drilled.

2) Glue the button to the bottom side so the part you press will be sticking out of the case. I used hot glue rather than super glue since I have a tendency to use to much and end up tearing off my finger prints on the item I’m attempting to glue.

3) Connect one jumper wire from side A of the switch to pin 1 on the BBB P9 interface.

4) Connect one jumper wire from side B of the switch to pin 9 on the P9 interface. Pin 9 is 5 positions down on the pin 1 side of the connector.

Cape_expansion_headers


5) Put the top of the case back on.

That’s all there is to it. Super easy and inexpensive way to make your BBB a bit more like a real computer.

Home arcade build list

Here are all the parts used in my home arcade setup. If you shop around you can probably find better pricing on some or all the parts:

* Optional – If your monitor does not have HDMI and/or speakers built in.

The Xtention cabinet is the only part that takes any time to assemble. Install the lastest mamebone image to the internal mmc on the BBB and you should be ready to start playing games.

The USB flash drive is for convince only. I have mine formatted as fat32 and extracted the extras zip file on it so I can easily add or remove game roms.

I created a short video with the whole thing assembled and running here: https://plus.google.com/111044629696916571063/posts/Fc22swza67k

New mamebone image

Made a few tweaks to the Mame-Beaglebone image. I’ve replaced Wahcade with AdvanceMENU. I like the look of Wahcade over AdvanceMENU but it lacks two features. AdvanceMENU re-builds the game list automatically when its started and can pull roms from multiple locations. With this new image you can run your roms from a external drive device connected to the USB port. Just unzip the sample external rom zip to the root of your USB drive and boot your BeagleBone with the drive connected.

Download the new mamebone image here: http://gencarelle.com/public_files/mamebone/mamebone-0.6.img

External rom zip with Robot Bowl ready to run: http://gencarelle.com/public_files/mamebone/extra_mamebone_games.zip

Mame on the Beaglebone Black

20140117_081445

A few years ago I put together an Mame arcade system using an old laptop, X-Arcade Tanksitck, and a Xtension Mini Arcade Cabinet.  Over the past few months the laptop has become flaky and now needs to be replaced. I figured the Beaglebone would be the perfect replacement as it has enough horsepower to run Mame, and low power enough that so I can just leave it running all the time.

Unfortunately I was not able to locate a prebuilt image that included Mame. Getting X to work properly with sound, and then finding a version of Mame that’ll compile on the Black’s arm chip turned out to be a bigger hassle than I expected. There are a number of things that need to be fixed but overall I think this image should work fine for running the games I had on the old laptop.

The image runs Debian as the OS, AdvanceMame for the game emulation, and Wahcade as a front end. It can be run either from an SD or copied on to the internal storage. Wahcade will start automatically when the system boots… just boot the system and its ready to go.

http://gencarelle.com/public_files/mamebone/mamebone-0.5.img

I’ve only included the Circus and Tankwars roms in this image. To add your own roms login with the user name mame with the password of mame. New roms go in the emulators/mame/roms directory.

If you try the image and have problems and/or suggestions let me know. I have a few more tweaks planned to make adding roms easier and will post how I got AdvanceMame to compile eventually.


Ads, Yay!

Sorry about the ads now being displayed here. Its not about making money… honestly I don’t expect to see a single cent. I’ve never setup Google AdSense and wanted to go through the exercise. Overall it was pretty easy, the only tricky part was I forgot to disable AdBlock and couldn’t figure out why my ads were not showing up. Oops.